Posts

Algorithmic Surface Modelling and Animation

Image
                                                  After completing the reading for this week I had a much better understanding of paneling and the in-class tutorials from this week. For my first attempt I wanted to panel a star shape across the lofted form I created for my first definition assignment. However this created numerous challenges and would not panel the shape. After a while of trying to fix this issue, I decided to take a new route.   (yeah I have no idea what happened here)  I decided to try a simpler option and opted for a dome shape with squiggly blue lines over top. This option turned out much better and I was able to animate it. I still thought I could go further as this was very basic.  In the end I ended up with a star shape that conformed to a sphere. For the animation aspect I rotated the paneled shape and the sphere. I wan...

Mile Stone Project 1: Stacked Slice

Image
 This week I focused on laser cutting my sliced stack model. I chose to use wood for my model instead of an alternative such as acrylic because I enjoy the texture. During the 210 laser cut pattern project I found that I enjoyed the wood grain texture, and dark scorch marks from the laser.  Left side  Front View  Top View  Right Side  I really like how my final stacked sliced model came out. I like the stepped or stair-like curves in the model. I think if I were to improve this model in any way I might try and make my overall form more round as the laser cut model became more oblong ( I think this is an issue with the depth of my material in my algorithm) In the future I would also like to experiment with different axis of slicing, and potentially painting the layers to create an ombre, or colour shifting effect. 

Mile Stone Project 1Stacked Slice: Progress

Image
I started this week by branching off of the in-class demonstrations. I enjoyed the loft demo and sweep demo the most so I decided to continue to work on those. I created to forms from those class demos that I then used with the contour parameter to produce the two works below   ( I struggled with the extrusion on this one but was able to get the contour lines, I think it is an issue with the geometry that I created in Rhino. I am still working to fix this issue with planar surface, etc. ) After creating these two forms that were direct interpretations of the class demo's I decided to explore what I could create using the techniques learned in the demo's The first is a bowl like structure where I used loft to control the inner depth. The second is a squared statue like structure that I created in Rhino, and applied the contour slicing to. ( I think if I continue with this square option I want to explore using different vectors to change the direction of the contours to create a ...

OBDF 310: Animation Struggles and Triumphs.

Image
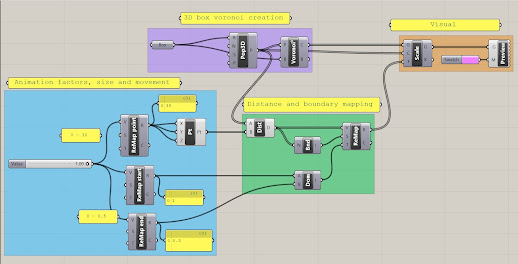
 This weekly assignment was a doozy. I knew what I wanted to create this week for my animation assignment, however upon opening grasshopper I realized I had no idea how to accomplish this, or how to word what I wanted to create. I spent lots of time this week exploring the various sections of parameters to find what I needed. For my animation I wanted to use the 3D populate parameter to create a cube where the inner forms would change.  After lots of exploring in grasshopper, and numerous google searches I discovered I needed to use a Voronoi parameter to create my desired pattern. After I found this parameter and used it alongside my box and 3D populate parameter, it just became a project of understanding what inputs I needed to have control over the cell-like shapes. My final algorithmic sequence looked like this.  The purple group is where I started my design, I used a box parameter to fulfil the boundary of my Voronoi. I also connected the box to the region input of t...

OBDF 310: My First Defintion!

Image
 Back at it again with Rhino, but this time with the addition of grasshopper! After these first few tutorials and exploring grasshopper I can tell that there is going to be a steep learning curve, but I am so excited to work with grasshopper. The tutorials were super engaging and definitely made me want to explore other tools in the program. I think my biggest wow moment with grasshopper so far as been how quickly  you can change the appearance of geometry or replace the logic of an entire section. I found most of the tutorials easy to follow and learned lots about how the interface works and how t find tools and understand data. The only area that I had issues with was the assigning colours. My definition that I made while following the tutorials did not show the gradient through the curves, rather they were all the same colour, so I will continue to look at that and see where I went wrong.  Tutorial Screenshots  Screenshot of most of the created parameters  Sc...

Surface Design: Laser Cut Final.

Image
  Surface Design: Laser Cut Final My favorite part about this aspect of the surface design project was getting to work with the technician and learn about how the laser cutter works. The discussion/demonstration given in class really pushed me to think about the possibilities of using the laser cutter. When it was time to print my designs I decided to print two copies one that did not have any cuts so I could see the full range of values, and one with cuts to see how this aspect of laser cutting could be used in further developing my design. I prefer the uncut version as I really appreciate the tonal range of the wood, and enjoy seeing the various layers of the design. The cut version has a unique aspect that creates a rhythm or movement, however, I did not account for the "bleed" of the lasers cuts into adjacent tonal ranges and can see some "spreading" that I would fix in the next edition. Going forward I think I want to continue researching surface design and ad...

Reverse Engineered Object selection

Image
Reverse Engineered Object : Object Selection For this week we were tasked with selecting an object to create through reverse engineering it in Rhino. I definitely had a hard time finding objects this week that were easy to dissect as well as complex enough for the project. When looking for object I struggled with finding dissectible object many things I found did not want to come a part or would require much more force to open them. I first thought of my bike helmet but realized quickly that while it has moving parts in the visor and vents the inside is mostly layers of foam making it not the best object for this project. Some of the other early object I had to avoid were mouses, tools, pencil sharpeners, staple removers, and other office supplies. While these objects appeared that they would work for the project I found them hard to dissect or not complex enough for the project.  Eventually I did start to find some solutions. I found that object which require human interaction to ...